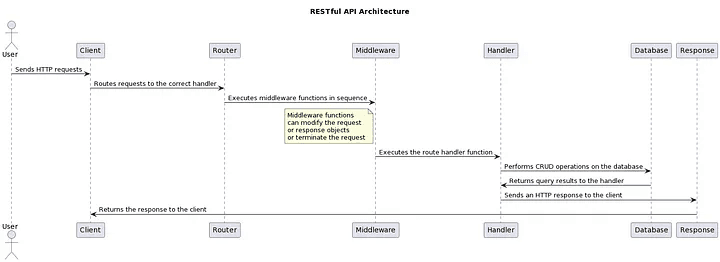
Building a RESTful API with Node.js
RESTful APIs are a popular way of building web applications that communicate with each other. In this tutorial, we will learn how to build a RESTful API using Node.js and the popular Express framework.
Prerequisites
Before we start building the API, we need to have the following installed on our system:
Node.js
NPM (Node Package Manager)
Getting Started
To get started, let’s create a new Node.js project and install the necessary dependencies. Open your terminal and run the following commands:
mkdir rest-api
cd rest-api
npm init -y
npm install express body-parser
The above commands will create a new directory called rest-api, initialize a new Node.js project with default settings, and install the Express and body-parser dependencies.
Setting Up the Server
Next, let’s create a new file called server.js in the root directory of our project and add the following code:
const express = require('express');
const bodyParser = require('body-parser');
const app = express();
app.use(bodyParser.json());
const port = 3000;
app.listen(port, () => {
  console.log(`Server running on port ${port}`);
});
The above code sets up an Express server that listens on port 3000 and uses the body-parser middleware to parse incoming requests with JSON payloads.
Creating the Routes
To create the routes for our API, let’s create a new file called routes.js in the root directory of our project and add the following code:
const express = require('express'); const router = express.Router();router.get('/', (req, res) => { res.send('Hello, world!'); });module.exports = router;
The above code creates a new Express router that responds to GET requests to the root URL (/) with a simple "Hello, world!" message.
Next, let’s update server.js to use the new router:
const express = require('express');
const bodyParser = require('body-parser');
const routes = require('./routes');
const app = express();
app.use(bodyParser.json());
app.use('/', routes);
const port = 3000;
app.listen(port, () => {
  console.log(`Server running on port ${port}`);
});
Now, when we run our server and visit http://localhost:3000/ in a web browser, we should see our "Hello, world!" message.
Adding Middleware
Middleware is a powerful feature of Express that allows us to modify incoming requests or outgoing responses before they are processed by our routes.
For example, let’s create a new middleware that logs incoming requests to the console. Add the following code to server.js:
app.use((req, res, next) => {
  console.log(`${req.method} ${req.path}`);
  next();
});
Now, when we make a request to our API, we should see the request method and path logged to the console.
Authentication
To add authentication to our API, we can use the jsonwebtoken package to generate and verify JSON Web Tokens. First, let's install the package by running the following command in our terminal:
npm install jsonwebtokenNext, let’s create a new file called auth.js in the root directory of our project and add the following code:
const jwt = require('jsonwebtoken');
const secretKey = 'my-secret-key';
function generateToken(payload) {
  return jwt.sign(payload, secretKey, { expiresIn: '1h' });
}
function verifyToken(token(token) {
 try {
   const decoded = jwt.verify(token, secretKey); return decoded;
 } catch (error) {
  return null;
 }
}
module.exports = { generateToken, verifyToken };
The above code exports two functions: `generateToken`, which generates a new JWT with an expiration time of one hour, and `verifyToken`, which verifies a JWT and returns the decoded payload if the token is valid. Next, let’s update our `routes.js` file to require authentication for certain routes:
const express = require('express');
const { generateToken, verifyToken } = require('./auth');
const router = express.Router();
router.get('/', (req, res) => {
  res.send('Hello, world!');
});
router.post('/login', (req, res) => {
  const { username, password } = req.body;
  if (username === 'admin' && password === 'password') {
    const token = generateToken({ username });
    res.json({ token });
  } else {
    res.status(401).json({ error: 'Invalid username or password' });
  }
});
router.get('/protected', (req, res) => {
  const token = req.headers.authorization?.split(' ')[1];
  const payload = verifyToken(token);
  if (payload) {
    res.send(`Hello, ${payload.username}!`);
  } else {
    res.status(401).json({ error: 'Invalid or missing token' });
  }
});
module.exports = router;
The above code adds three new routes:
POST /login
A route that accepts a JSON payload with a username and password, verifies the credentials, and returns a JWT if the credentials are valid.
GET /protected
A route that requires a valid JWT to access. The route reads the JWT from the Authorization header and uses the verifyToken function to decode the payload. If the token is valid, the route sends a personalized greeting to the user; otherwise, it returns an error.
Conclusion
In this tutorial, we learned how to build a RESTful API using Node.js and Express. We covered topics such as routing, middleware, and authentication, and used popular packages such as body-parser and jsonwebtoken to simplify our code. We also saw how to use architecture diagrams to visualize our application's components and understand how they work together. Thanks for reading! #Nodejs #RESTfulAPI #Express #Middleware #Authentication #JSONWebTokens
